Mastering WordPress: Create, Customize, and SEO-optimize Your Child Theme
Mastering WordPress: Learn to create, customize, and optimize child themes for your WordPress website with a focus on SEO and essential plugins.
Introduction to WordPress Child Themes
In the dynamic world of WordPress, your website’s appearance and functionality depend heavily on the choice of WordPress themes. These themes dictate the visual style and layout of your WordPress website. However, what happens when you want to customize your theme to fit your unique needs and style preferences while maintaining good WordPress SEO practices and integrating essential WordPress plugins?
That’s where the concept of a child theme comes into play.
Why WordPress Child Themes Matter
A child theme is a WordPress theme that inherits the functionality and styling of another theme, known as the parent theme. Creating and using a child theme is crucial because it allows you to make customizations to your WordPress website without altering the original theme’s core files. This approach safeguards your changes, ensuring that they persist even when the parent theme receives updates. It’s an essential practice for maintaining the integrity of your site while optimizing for WordPress SEO and leveraging WordPress plugins for enhanced functionality.
WordPress Themes and Selecting a Parent Theme
Choosing the right parent theme for your child theme is a critical decision for your WordPress website customization. The parent theme serves as the foundation on which you’ll build your site’s unique style and functionality.
Design Matters
The design of your parent theme sets the visual tone for your website. It should align with your brand, convey your message effectively, and offer a clean, appealing layout. Remember that you can make design customizations in your child theme, but starting with a parent theme that already resonates with your vision can save you time and effort.
Functionality and Features
Assess the functionality provided by the parent theme. It should come with features that match your website’s goals. For instance, if you’re running an e-commerce site, the parent theme should support e-commerce features seamlessly. Choosing a parent theme with the right functionality can prevent the need for extensive custom coding and third-party WordPress plugins.
Compatibility with WordPress Updates
Ensure that the parent theme you select is regularly updated and compatible with the latest versions of WordPress. This ensures that your website remains secure and functional as WordPress releases updates. A well-maintained parent theme is essential for long-term site stability.
By carefully considering these factors when choosing your parent theme, you’ll establish a solid foundation for your child theme, making the customization process more efficient and effective.
Selecting WordPress Plugins To Create the Child Theme
Once you have selected your parent theme, selecting the right child theme plugins for your WordPress website, will make the process of creating a child theme, one of the easiest ways for enhancing functionality and customization.Here are three different Child theme plugins that can be beneficial:
Child Theme Configurator by Lialea Media:
- Description: This plugin simplifies the process of creating and customizing child themes. It helps you duplicate your parent theme and provides an interface for making modifications.
- Features: It allows you to copy template files, import and export settings, and preview your changes.
- Why Choose It: Child Theme Configurator is user-friendly and helps you set up child themes without extensive coding knowledge. It’s a popular choice for beginners and those who want a straightforward solution.
One-Click Child Theme:
- Description: This plugin is designed for quick child theme creation. With a single click, it generates a child theme based on your active parent theme.
- Features: It automatically copies your parent theme’s files, including styles and functions.
- Why Choose It: One-Click Child Theme is incredibly simple and efficient. If you need to create a child theme with minimal effort, this is a great option.
Starter Templates – Child Themes for Divi:
- Description: If you’re using the Divi theme, this plugin offers a collection of child themes designed for specific purposes. It’s particularly useful if you use the Divi Builder.
- Features: It provides a variety of pre-designed child themes, each with a unique style and layout.
- Why Choose It: Starter Templates is ideal if you want to quickly apply a professional design to your Divi-powered site without extensive customization work.
When choosing a child theme plugin, consider your specific needs, level of expertise, and the parent theme you’re using. Each of these plugins serves a different purpose and caters to various user preferences. Make your choice based on what aligns best with your project’s requirements and your familiarity with WordPress and child theme development.
How to Install a Child Theme on Any Theme
To create a child theme for any theme you’re using, and for the purpose of this article, we will be working with an recommend using the plugin “Child Theme Configurator.” simply because its one that we have used and has never let us down.
First, in your WordPress Dashboard, go to your Plugins Menu and select “Add New.” Search for a plugin called “Child Theme Configurator,” and the one we’re looking for is the first one shown below, “Child Theme Configurator.” You can press “Install Now,” and once installed, you can also press “Activate.”
Now you should be able to see it in your plugins menu. See below.


Now, if you go down into “Tools” on the left-hand side, right at the bottom, you’ll see “Child Themes.” So, what this plugin will do is help you create a child theme for your existing theme. It’s really simple, and I’ll walk you through it.
By default, you can see it says, “Select Action: Create a new child theme, install a new customizable child theme using an installed theme as a parent,” so that’s exactly what we’re going to be doing. Our parent theme is a theme that we have already installed, and we’re going to be creating a child theme to put on top of it so that we can make our changes without having them erased when an update comes through.
On the left-hand side, step number two, we see “Select a Parent Theme,” here you can see all the themes you currently have installed on your website. As you can see here, we have the Kadence Theme installed. I’m going to click on Kadence, but you can select whichever theme you’re currently working with that you want to create a child theme for. Once that’s done, just go ahead and press “Analyze.”


As you cans see above, after it’s done checking, it will say, “This theme appears to be okay to use as a child theme.” It’s good to go.
In step number four, below, it says, “Name the new theme directory,” and in the image you can see, it’s currently “Kadence-child,” so it’s going to be your theme name followed by “dash child.” Usually, I like to keep it the exact same, just like that. You can leave it as is unless you want to change it to something more specific.
In step number five, it says, “Select where to save the new styles.” You can keep that on “Primary stylesheet,” just like that. We don’t have to touch that. Select “Parent theme styling handling,” and we won’t touch any of these settings either. We’ll just keep them as the default.

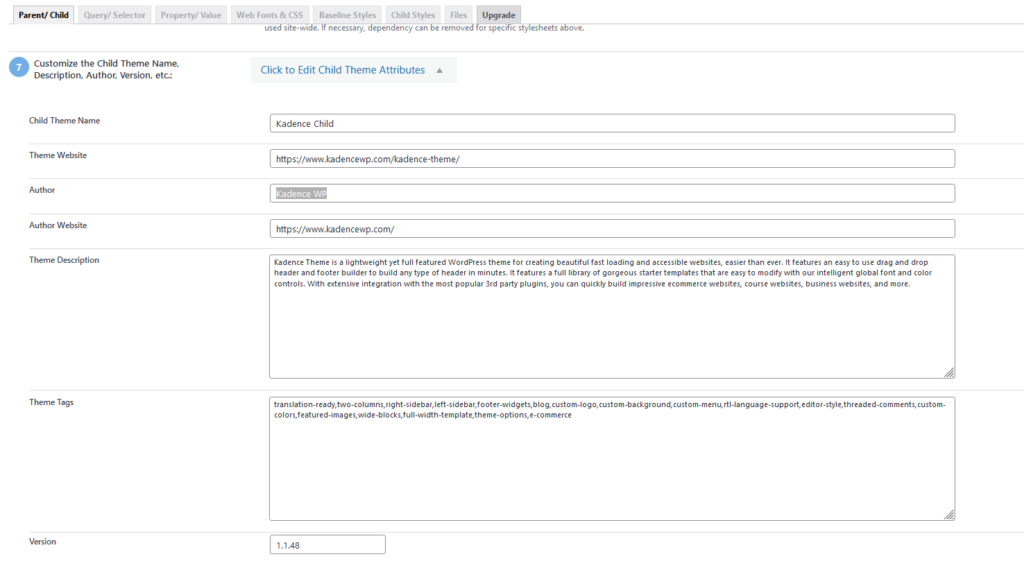
If we scroll down, we just keep the rest of these default as well. We won’t touch any of that. In step number seven, you can actually Customize the child theme name, description, author, version, etc.. So, if you drop that down, the child theme name, you can change it to whatever you like. Over here, you can change the theme website. At the moment, it’s set to “Kadence Child” because it’s the Kadence theme we’re working with, and the author is, of course, “Kadence WP.” You can also include the author’s website. You can change these as you’d like. You can even add a theme description, theme tags, and even a version number. For this tutorial, we’ll just keep them as they are, but feel free to change them as you wish.

In step number 8, the setting shown in the image below, is very important, because when you install a child theme, it can sometimes be common to have widgets and other designs on your website shift around and move. By checking this option, we’re telling the Child Theme Configurator to copy all these settings, menus, widgets, and customizer settings from the parent theme into the child theme. This preserves all those settings for you within the child theme.
So you will need to check that, and after that, in step 9 we’re ready to proceed and hit the Create New Child Theme button.

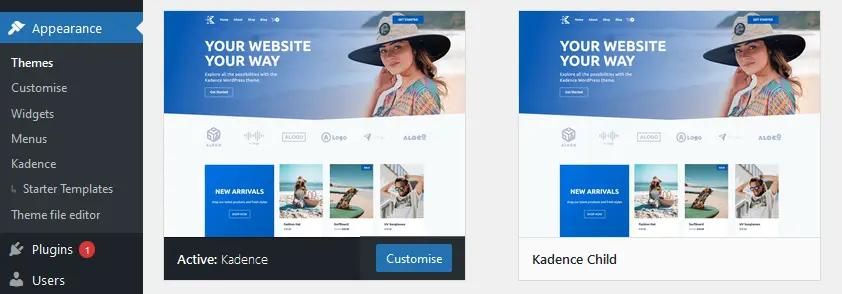
Once that’s done, in our WordPress Dashboard, we can go into our Appearance tab again and Themes.” As you can see here, it’s already gone ahead and added our new Kadence Child Theme onto our themes menu. You can see the Child Theme is there but do not hit the Activate button yet.

>> Caution: Proceed with Extreme Caution<<
Altering your WordPress theme can have catastrophic consequences for your website, especially if you lack the expertise. The forthcoming steps are tailored more towards experienced WordPress for developers, requiring intricate knowledge of:
- Accessing Your Hosting Control Panel
- Navigating the File Manager
- Locating Your WordPress Installation
- Gaining Entry to the “wp-content” Directory
- Identifying Your Child Theme Directory
- Creating a <header.php> file
If these technical terms seem alien, and you are unfamiliar with the procedures, we strongly advise against attempting these changes independently. Engaging an experienced professional or reputable company is highly recommended. A modest investment now can potentially avert significant future complications. Dhubab is at your service, so don’t hesitate to contact us for expert assistance. Your website’s security and functionality are at stake.

Accessing WordPress Website Hosting Control Panel
- Log in to Your Web Hosting Account: Begin by logging in to your web hosting provider’s website using your account credentials. If you’re not sure where to log in, you can typically find the login link on the hosting provider’s homepage. You can also contact your hosting provider for guidance.
- Locate the Control Panel: Once you’re logged in, look for the hosting control panel. It might be labeled as “Control Panel,” “cPanel,” “Plesk,” or something similar, depending on your hosting provider. Click on this option to access your control panel.
- Enter Your Control Panel Credentials: Some hosting providers require a separate set of login credentials for the control panel. If prompted, enter your control panel username and password. This information may differ from your hosting account login details. If in doubt, speak to your hosting provider.
- Access Your Control Panel: Once you’ve successfully entered your control panel credentials, you’ll be directed to the hosting control panel dashboard. This is where you can manage various aspects of your hosting account, including file management, databases, and more.
Your web hosting control panel is a powerful tool that allows you to configure and manage server-related settings, such as creating files, managing databases, and adjusting server configurations. Accessing it is essential for tasks like creating or editing the header.php file for your child theme customizations.

