wordpress

Mastering WordPress: Create, Customize, and SEO-optimize Your Child Theme

Mastering WordPress: Learn to create, customize, and optimize child themes for your WordPress website with a focus on SEO and essential plugins.

Introduction to WordPress Child Themes

In the dynamic world of WordPress, your website’s appearance and functionality depend heavily on the choice of WordPress themes. These themes dictate the visual style and layout of your WordPress website. However, what happens when you want to customize your theme to fit your unique needs and style preferences while maintaining good WordPress SEO practices and integrating essential WordPress plugins?

That’s where the concept of a child theme comes into play.

Why WordPress Child Themes Matter

A child theme is a WordPress theme that inherits the functionality and styling of another theme, known as the parent theme. Creating and using a child theme is crucial because it allows you to make customizations to your WordPress website without altering the original theme’s core files. This approach safeguards your changes, ensuring that they persist even when the parent theme receives updates. It’s an essential practice for maintaining the integrity of your site while optimizing for WordPress SEO and leveraging WordPress plugins for enhanced functionality.

WordPress Themes and Selecting a Parent Theme

Choosing the right parent theme for your child theme is a critical decision for your WordPress website customization. The parent theme serves as the foundation on which you’ll build your site’s unique style and functionality.

Design Matters

The design of your parent theme sets the visual tone for your website. It should align with your brand, convey your message effectively, and offer a clean, appealing layout. Remember that you can make design customizations in your child theme, but starting with a parent theme that already resonates with your vision can save you time and effort.

Functionality and Features

Assess the functionality provided by the parent theme. It should come with features that match your website’s goals. For instance, if you’re running an e-commerce site, the parent theme should support e-commerce features seamlessly. Choosing a parent theme with the right functionality can prevent the need for extensive custom coding and third-party WordPress plugins.

Compatibility with WordPress Updates

Ensure that the parent theme you select is regularly updated and compatible with the latest versions of WordPress. This ensures that your website remains secure and functional as WordPress releases updates. A well-maintained parent theme is essential for long-term site stability.

By carefully considering these factors when choosing your parent theme, you’ll establish a solid foundation for your child theme, making the customization process more efficient and effective.

Selecting WordPress Plugins To Create the Child Theme

Once you have selected your parent theme, selecting the right child theme plugins for your WordPress website, will make the process of creating a child theme, one of the easiest ways for enhancing functionality and customization.

Here are three different Child theme plugins that can be beneficial:

Child Theme Configurator by Lialea Media:

  • Description: This plugin simplifies the process of creating and customizing child themes. It helps you duplicate your parent theme and provides an interface for making modifications.
  • Features: It allows you to copy template files, import and export settings, and preview your changes.
  • Why Choose It: Child Theme Configurator is user-friendly and helps you set up child themes without extensive coding knowledge. It’s a popular choice for beginners and those who want a straightforward solution.

One-Click Child Theme:

  • Description: This plugin is designed for quick child theme creation. With a single click, it generates a child theme based on your active parent theme.
  • Features: It automatically copies your parent theme’s files, including styles and functions.
  • Why Choose It: One-Click Child Theme is incredibly simple and efficient. If you need to create a child theme with minimal effort, this is a great option.

Starter Templates – Child Themes for Divi:

  • Description: If you’re using the Divi theme, this plugin offers a collection of child themes designed for specific purposes. It’s particularly useful if you use the Divi Builder.
  • Features: It provides a variety of pre-designed child themes, each with a unique style and layout.
  • Why Choose It: Starter Templates is ideal if you want to quickly apply a professional design to your Divi-powered site without extensive customization work.

When choosing a child theme plugin, consider your specific needs, level of expertise, and the parent theme you’re using. Each of these plugins serves a different purpose and caters to various user preferences. Make your choice based on what aligns best with your project’s requirements and your familiarity with WordPress and child theme development.

How to Install a Child Theme on Any Theme

To create a child theme for any theme you’re using, and for the purpose of this article, we will be working with an recommend using the plugin “Child Theme Configurator.” simply because its one that we have used and has never let us down.

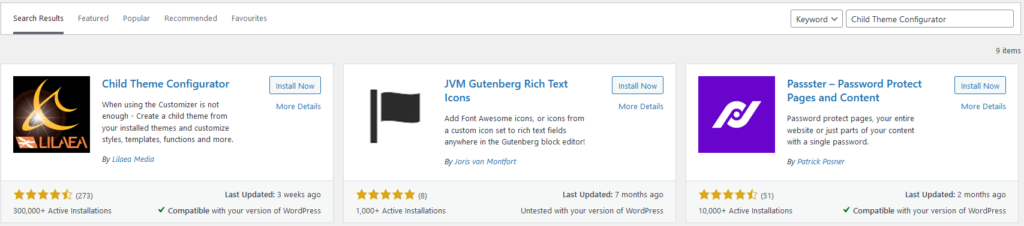
First, in your WordPress Dashboard, go to your Plugins Menu and select “Add New.” Search for a plugin called “Child Theme Configurator,” and the one we’re looking for is the first one shown below, “Child Theme Configurator.” You can press “Install Now,” and once installed, you can also press “Activate.”

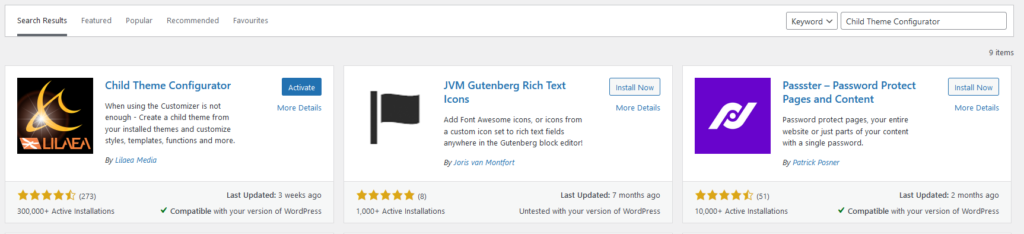
Now you should be able to see it in your plugins menu. See below.

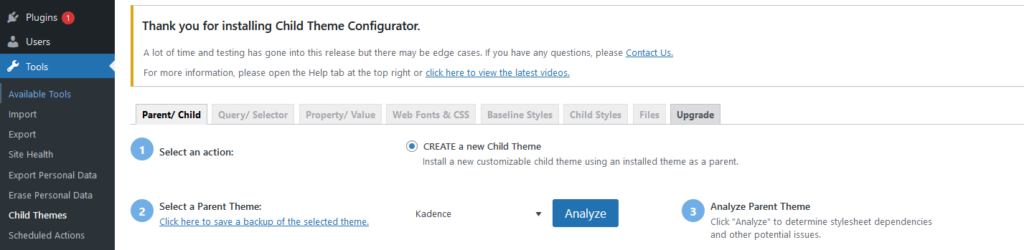
Now, if you go down into “Tools” on the left-hand side, right at the bottom, you’ll see “Child Themes.” So, what this plugin will do is help you create a child theme for your existing theme. It’s really simple, and I’ll walk you through it.

By default, you can see it says, “Select Action: Create a new child theme, install a new customizable child theme using an installed theme as a parent,” so that’s exactly what we’re going to be doing. Our parent theme is a theme that we have already installed, and we’re going to be creating a child theme to put on top of it so that we can make our changes without having them erased when an update comes through.

On the left-hand side, step number two, we see “Select a Parent Theme,” here you can see all the themes you currently have installed on your website. As you can see here, we have the Kadence Theme installed. I’m going to click on Kadence, but you can select whichever theme you’re currently working with that you want to create a child theme for. Once that’s done, just go ahead and press “Analyze.”

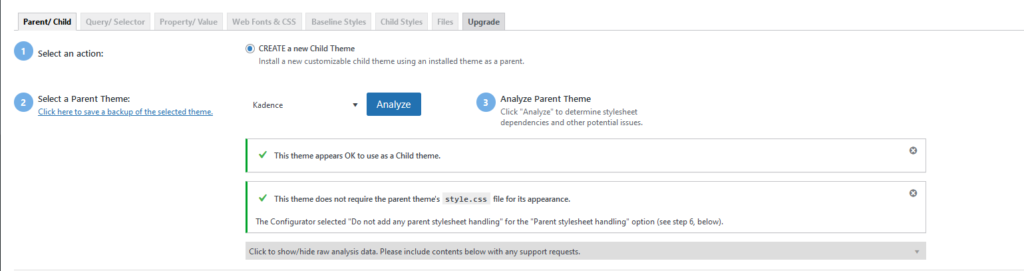
As you cans see above, after it’s done checking, it will say, “This theme appears to be okay to use as a child theme.” It’s good to go.

In step number four, below, it says, “Name the new theme directory,” and in the image you can see, it’s currently “Kadence-child,” so it’s going to be your theme name followed by “dash child.” Usually, I like to keep it the exact same, just like that. You can leave it as is unless you want to change it to something more specific.

In step number five, it says, “Select where to save the new styles.” You can keep that on “Primary stylesheet,” just like that. We don’t have to touch that. Select “Parent theme styling handling,” and we won’t touch any of these settings either. We’ll just keep them as the default.

If we scroll down, we just keep the rest of these default as well. We won’t touch any of that. In step number seven, you can actually Customize the child theme name, description, author, version, etc.. So, if you drop that down, the child theme name, you can change it to whatever you like. Over here, you can change the theme website. At the moment, it’s set to “Kadence Child” because it’s the Kadence theme we’re working with, and the author is, of course, “Kadence WP.” You can also include the author’s website. You can change these as you’d like. You can even add a theme description, theme tags, and even a version number. For this tutorial, we’ll just keep them as they are, but feel free to change them as you wish.

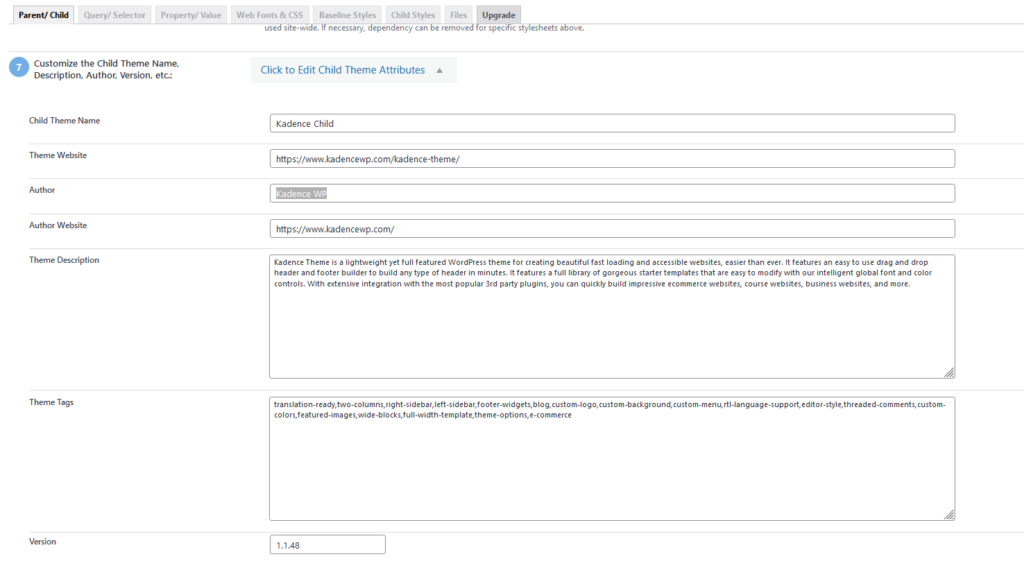
In step number 8, the setting shown in the image below, is very important, because when you install a child theme, it can sometimes be common to have widgets and other designs on your website shift around and move. By checking this option, we’re telling the Child Theme Configurator to copy all these settings, menus, widgets, and customizer settings from the parent theme into the child theme. This preserves all those settings for you within the child theme.

So you will need to check that, and after that, in step 9 we’re ready to proceed and hit the Create New Child Theme button.

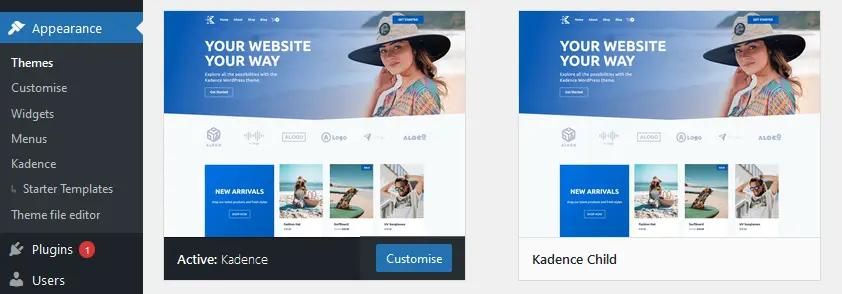
Once that’s done, in our WordPress Dashboard, we can go into our Appearance tab again and Themes.” As you can see here, it’s already gone ahead and added our new Kadence Child Theme onto our themes menu. You can see the Child Theme is there but do not hit the Activate button yet.


>> Caution: Proceed with Extreme Caution<<

Altering your WordPress theme can have catastrophic consequences for your website, especially if you lack the expertise. The forthcoming steps are tailored more towards experienced WordPress for developers, requiring intricate knowledge of:

  • Accessing Your Hosting Control Panel
  • Navigating the File Manager
  • Locating Your WordPress Installation
  • Gaining Entry to the “wp-content” Directory
  • Identifying Your Child Theme Directory
  • Creating a <header.php> file

If these technical terms seem alien, and you are unfamiliar with the procedures, we strongly advise against attempting these changes independently. Engaging an experienced professional or reputable company is highly recommended. A modest investment now can potentially avert significant future complications. Dhubab is at your service, so don’t hesitate to contact us for expert assistance. Your website’s security and functionality are at stake.

Accessing WordPress Website Hosting Control Panel

  1. Log in to Your Web Hosting Account: Begin by logging in to your web hosting provider’s website using your account credentials. If you’re not sure where to log in, you can typically find the login link on the hosting provider’s homepage. You can also contact your hosting provider for guidance.
  2. Locate the Control Panel: Once you’re logged in, look for the hosting control panel. It might be labeled as “Control Panel,” “cPanel,” “Plesk,” or something similar, depending on your hosting provider. Click on this option to access your control panel.
  3. Enter Your Control Panel Credentials: Some hosting providers require a separate set of login credentials for the control panel. If prompted, enter your control panel username and password. This information may differ from your hosting account login details. If in doubt, speak to your hosting provider.
  4. Access Your Control Panel: Once you’ve successfully entered your control panel credentials, you’ll be directed to the hosting control panel dashboard. This is where you can manage various aspects of your hosting account, including file management, databases, and more.

Your web hosting control panel is a powerful tool that allows you to configure and manage server-related settings, such as creating files, managing databases, and adjusting server configurations. Accessing it is essential for tasks like creating or editing the header.php file for your child theme customizations.

Navigating the File Manager And How to Locate Your Child Theme Directory

Once you have access to your WordPress Website Control Panel, you will see the website’s files through the hosting control panel. Look for the Folder File Manager, you can locate your child theme directory using the file manager. Here’s the path and then in more detail how to:

Typically the path is: Control Panel > File Manager > public_html > wp-content > themes > child theme directory

  1. Once you have logged into your Hosting Control Panel: Access your web hosting control panel (cPanel, Plesk, or a similar control panel) by logging in with your hosting credentials. The login details are usually provided by your hosting provider.
  2. Locate the File Manager: Look for the “File Manager” or a similarly named option. This is the tool you’ll use to manage your website’s files and directories.
  3. Navigate to Your WordPress Installation: Use the file manager to navigate to the directory where your WordPress website is installed. This may be in the “public_html” directory or another location, depending on your hosting setup.
  4. Access the “wp-content” Directory: Inside your WordPress installation directory, you’ll find the “wp-content” directory. Open this directory.
  5. Find Your Child Theme Directory: Within the “wp-content” directory, there should be a folder called “themes.” Open this folder to see a list of all the installed themes, including your child theme directory. The child theme directory will have the same name as your child theme.

Once you’ve located your child theme directory, you can access and edit the necessary files within it using the file manager. This includes creating or editing the header.php file, as mentioned earlier.

Creating the Child Theme (header.php) File

The header.php file is a pivotal element in the structure of your WordPress theme, governing the top portion of your website, which typically includes the site’s logo, navigation menu, and other key elements.

You don’t need to create a new folder called “header.php.” You need to enter the Child Theme Folder and here you should create a new file named “header.php” directly in the child theme directory. Here’s how you should do it:

Typically the path is: File Manager > public_html > wp-content > Themes > (Your Theme Name) Child Theme > Right Click > create a new file named “header.php > Create.

Here is the steps in more detail:

  1. Access your child theme directory: In your file manager or FTP client, navigate to the directory of your child theme. This directory should be within the “wp-content/themes” directory.
  2. Create a new file: In the child theme directory, create a new file named “header.php.” To create a new file, you can typically right-click within the directory, select “New” or “Create,” and choose “File.” Name the file “header.php.”
  3. Edit the new “header.php” file: After creating the “header.php” file, open it in your code editor. You can add the necessary code for your site’s section, including meta tags, stylesheets, and scripts.
  4. Customize the “header.php” file: Customize the “header.php” file as needed, adding the meta tags and other elements you want in the section.

Once that’s done, go back to your websites WordPress Dashboard, and on the left look for the “Appearance” tab, and “Themes.”

As you can see below, it’s already gone ahead and added the Theme Header (header.php) file to our Kadence Child Theme onto our themes menu. But do not activate yet, as you click on the on the (header.php) you can see the file is empty.

Copying Header.php Code

Now that you’ve created a header.php file in your child theme directory, it’s time to transfer and customize the code from the main theme’s header.php file while preserving the parent theme’s structure. Follow these steps:

  1. Go back to the parent theme and locate the main theme’s (header.php).
  2. Copy the Code inside the parent theme’s (header.php).
  3. Go back to your Child Theme and Paste the Code in your Child Theme’s (header.php) and save.
  4. Go back to Appearance and activate the child theme.
  5. Check your website, ensure everything is working as it should be.

Once you have confirmed everything is working, now you can review the pasted code in your child theme’s header.php file and customize it to match your design and functionality requirements. This is the stage where you can make adjustments to the header elements, styles, and any additional features you want to include.

It’s crucial to preserve the structure of the parent theme’s header.php file, especially the parts responsible for essential functionality. Customize and modify the code as needed while ensuring that the core structure is retained. This ensures that your website remains stable and continues to function seamlessly, even as you make customizations.

Once that’s activated, you can see below our Child Theme is activated and good to go. You can see below “Kadence Child,” and that’s the one that’s currently active, indicated by the black mark you see in the image below. We also have the parent theme next to it. Remember, don’t delete the parent theme because the child theme completely depends upon the parent theme. The child theme just sits on top of the parent theme and keeps all your customizations and settings within the child. That way, when your parent theme gets an update, all the customizations and changes you’ve made will be preserved within this child theme you’ve created.

Now you can proceed to make any customizations you wish onto your child theme. What’s really cool about this plugin is once the child theme is created, you can actually go ahead and remove the plugin, so you don’t actually have to keep it once you finish creating.

Customizing the Header

With your child theme’s header.php file in place, you have the creative freedom to make various customizations to your WordPress website’s header section. Here are some examples of the types of customizations you can implement:

1. Custom Logo: You can replace the default logo with your own custom logo, aligning it with your brand identity. Upload your logo image to your child theme’s directory, then update the code in the header.php file to display your custom logo instead of the default one.

2. Color Scheme: Modify the color scheme of your header to match your branding. Adjust background colors, text colors, and link colors to create a cohesive and visually appealing header design.

3. Navigation Menu: Enhance user experience by customizing the navigation menu. You can restructure the menu layout, change menu item styling, or add dropdown menus for improved navigation.

4. Site Title and Tagline:Edit the site title and tagline to ensure they reflect your site’s purpose and message accurately. You can also adjust their styling to harmonize with your site’s design.

5. Layout and Structure: Modify the layout and structure of the header to better suit your content. This might involve changing the placement of elements, adjusting spacing, or adding custom elements like social media icons or search bars.

6. Additional Functionality: Add new functionality to the header section, such as a dynamic search bar, a contact button, or a call-to-action element. This can help engage visitors and guide them to specific actions on your site.

The possibilities for customizing your header are extensive. Your child theme’s header.php file serves as the canvas for your creativity, allowing you to achieve a header design that uniquely represents your brand and goals.

Testing Your Child Theme

Once you’ve made customizations to your child theme‘s header.php file or any other part of your theme, it’s essential to thoroughly test your website to ensure that everything is working as expected. Here’s how to go about it:

1. Verify Visual Consistency: First and foremost, check the visual consistency of your website. Ensure that the header elements, colors, and layout are as intended. Pay close attention to your custom logo, navigation menu, and any styling changes to make sure they align with your branding.

2. Test Site Functionality: Interact with your website as a visitor would. Navigate through the site, test links and buttons, and ensure that the menu items work correctly. If you’ve added any additional functionality in the header, such as search bars or call-to-action buttons, make sure they perform as expected.

3. Check Responsiveness: Verify that your website is responsive, meaning it adapts well to various screen sizes, including mobile devices and tablets. Check the header’s appearance and functionality on different devices to ensure a seamless user experience.

4. Test on Different Browsers: Open your website in various web browsers such as Chrome, Firefox, Safari, and Edge. Test the header’s performance and appearance to guarantee cross-browser compatibility.

5. Conduct SEO Tests: If you’ve made significant changes to your website’s structure or content, it’s important to run WordPress SEO tests to ensure that your site’s search engine optimization remains intact. Check that titles, meta descriptions, and structured data are functioning correctly.

6. Seek User Feedback: Engage others to explore your website and provide feedback. Their fresh perspective can help you identify any issues you might have missed during your own testing. User feedback is invaluable for improving your site.

Thoroughly testing your child theme ensures that your customizations work seamlessly and that your website maintains its professional appearance and functionality. Address any issues you discover promptly to deliver a polished and user-friendly experience to your site visitors.

Best Practices and Tips

Best Practices for Maintaining and Updating Child Themes:

1. Regular Backups: Before making any major customizations or updates to your child theme, always back up your website. This precaution ensures you can restore your site in case something goes awry during the process.

2. Document Your Changes: Keep detailed records of the customizations you make in your child theme’s header.php file or other theme files. This documentation helps you quickly identify and address issues and simplifies future updates.

3. Stay Informed: Stay updated with the latest WordPress developments, including updates to the parent theme and WordPress core. Compatibility is key, so ensure your child theme remains in sync with the latest technology.

4. Child Theme Activation: Always activate your child theme in WordPress. Neglecting to do so might lead to unintended consequences if you make changes directly to the parent theme.

5. Use Child Theme for Custom Code: If you need to add custom code or scripts to your website, do so in your child theme’s functions.php file. This way, your customizations remain intact even when the parent theme updates.

Tips for Resolving Common Customization Issues:

1. CSS Conflicts: If you encounter CSS conflicts after customizing, use browser developer tools or dedicated WordPress plugins to pinpoint and resolve issues. Adjust your CSS rules as needed.

2. Plugin Compatibility: When adding new WordPress plugins, test them with your child theme to ensure they work seamlessly. Some plugins may require additional customization to fit your design.

3. Child Theme Updates: Regularly check for updates to the child theme itself. Authors may release updates to improve functionality or address issues. Always update your child theme after a backup to keep it secure and optimized.

4. Debugging: If you encounter technical problems or errors, use WordPress debugging tools and logs to identify the root cause. Troubleshoot systematically to locate and address the issue effectively.

5. Community Support: Don’t hesitate to seek assistance from the WordPress community through forums and support networks. You’re likely to find solutions and advice from experienced users and developers.

By following these best practices and tips, you’ll maintain a stable, well-optimized, and visually appealing WordPress website with a child theme that serves as a solid foundation for your customizations.

Additional Resources

To continue learning and enhancing your skills in WordPress child themes and customization, consider exploring the following resources, tutorials, and tools:

1. WordPress.org Codex:

Visit the official WordPress Codex, a comprehensive resource for WordPress documentation. It provides in-depth guides on child themes, theme development, and WordPress best practices.

WordPress.org Codex

2. WPBeginner:

WPBeginner is an excellent website for beginners, offering numerous tutorials, tips, and tricks for WordPress users. You’ll find helpful guides on child themes and various customization techniques.

WPBeginner

3. Smashing Magazine:

Smashing Magazine regularly publishes articles on WordPress development, design, and customization. It’s a great resource for staying up to date with the latest WordPress trends and techniques.

Smashing Magazine

4. WordPress Child Theme Generator:

If you want to quickly generate a child theme for your site, consider using a child theme generator tool. This online tool simplifies the process of creating a child theme.

WordPress Child Theme Generator

5. WordPress Stack Exchange:

WordPress Stack Exchange is a community-driven question-and-answer platform. You can search for answers to specific issues, ask your own questions, and get assistance from experienced WordPress users and developers.

WordPress Stack Exchange

These resources will help you expand your knowledge, improve your skills, and keep your WordPress site running smoothly with custom child themes. Happy customizing!

Final Thoughts and Key Takeaways

As we wrap up this guide, let’s recap the essential takeaways and offer that final push to get you started on your WordPress customization journey with child themes:

1. Protect Your Customizations:

Child themes are your safeguard against losing customizations when the parent theme updates. They keep your website consistent and professional, even as you make changes.

2. Customize to Your Heart’s Content:

With a child theme, you’re free to unleash your creativity. You can customize every aspect of your website, from design and layout to functionality, to create a unique online presence.

3. Testing and Maintenance Matter:

Thoroughly test your child theme to ensure that everything runs smoothly. Regular maintenance and updates keep your site secure and performing at its best.

4. Learning Never Ends:

WordPress customization is an ongoing adventure. Continuously explore, learn, and experiment with child themes and advanced techniques to enhance your site’s user experience and functionality.

Your creative vision is the engine that drives your website’s success. Don’t hesitate—create your child theme, embrace the world of WordPress customization, and set forth on an exciting journey to design a site that captivates your audience and fulfills your aspirations. Your website’s potential is boundless; the time to begin is now. Happy customizing!

About Dhubab Digital Marketing Agency

Dhubab Digital Marketing Agency is your partner in building a strong online presence. With over a decade of experience in the digital marketing industry, we specialize in web design, content writing, SEO, backlinks, lead magnet funnels, lead magnet creation, landing page design, and email marketing.

Our mission is to help businesses thrive in the digital landscape. We understand the dynamic nature of the online world and are committed to staying at the forefront of industry trends to deliver innovative solutions that drive results.

At Dhubab, we combine our expertise with a personalized approach, working closely with our clients to understand their unique needs and goals. We’re not just a digital marketing agency; we’re a partner dedicated to your success.

Contact Dhubab Digital Marketing Agency

If you’re ready to supercharge your digital marketing efforts, get in touch with us today. Our team of experts is here to assist you in achieving your online marketing objectives.

Contact Information:

Connect with us and let’s work together to elevate your digital marketing strategy and drive your business to new heights.